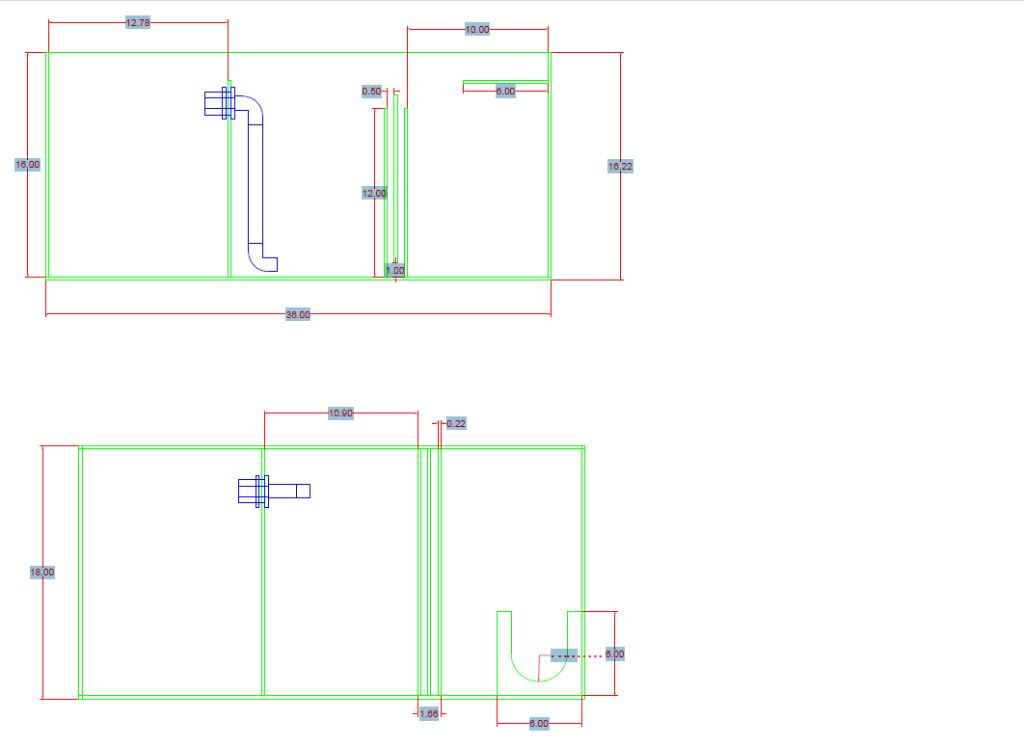
******** I wrote this DIY so you can either follow along step by step using my measurements and build the exact sump that I have laid out for my system if you find that this sump will work for your tank. OR You can design your own sump that better fits your aquarium needs, and just switch my measurements with yours and just follow the actual building process. Hopefully this will help you build a sump that is right for your Aquarium(s).
[Timezone Detection]
Create Account - Join in Seconds!
-
06-15-2011, 12:37 PM #1
 BadFish's DIY Vol.2: Don't Be a Chump, Build Your Own Sump
Last edited by Badfish; 06-15-2011 at 01:00 PM.
-
06-15-2011, 12:44 PM #2

These are Plans for an Acrylic 36”x18”x16” sump/refugium, the total volume of this sump is around 45 gal. It will have 3 chambers, an intake/ skimmer chamber, Pump chamber, and a fuge. This setup is pretty much a bare bones sump and will be easy to customize any way you want. I am making it for an in-sump skimmer and a submersible pump with the return split between the display tank and fuge, and will be controlled by every reefers best friend ..Ball valves.
Sump Design

Sump for Sale Online

I found this similar sump from online store (that will remain nameless),the total with shipping is about $516!!!! Yeah I know it’s shipping for an “overweight/sized” and it’s through the roof, so let’s say you get free shipping or buy it for a LFS, it’s still $430. There are many sumps online and in stores, and I also found that most of them are ridiculously overpriced as well.
This is a fairly easy build, the few tools you need most people have around the house and all the material needed can be bought from most home improvement stores.
Tools:
Sharpie
Measuring Tape
Sand Paper
Cutting tool (Power saws are the easiest and fastest to use. I used a table saw because they make the straightest cuts, but if you don’t have access to a table saw you can use a skill saw. And if you are uncomfortable with using a power saw altogether I believe you can have the acrylic cut for you at Home Depot and Lowes. I also seen that you can score the acrylic with a tool and snap it like you do with glass but I have never tried this. )
Some CD cases (they make great braces)
---------- Post added at 01:42 PM ---------- Previous post was at 01:41 PM ----------
Materials:
1x Roll of Painters tape (don’t leave a mess like Duct tape) http://www.menards.com/main/home-dec...094-c-7185.htm
4x Sheets of .220 24”x48” Acrylic (I measured it out so you will have a little left over to build a skimmer stand, filter sock hold and extra bracing if needed). http://www.menards.com/main/building...036-c-7552.htm
Weld-On #16 (I used 1 tube, but you may want 2 to be safe. It’s doesn’t cost much but it’s hard to find) Weld-On #16 Plexiglas Acrylic Solvent Adhesive Glue in 5oz Tubes, Pts, Qts, Gallon
That’s it, that make the grand total of this sump around $178. Actually I got my acrylic when Menard’s was having one of it many sales, and got 15% off. So if you are in no hurry you can wait for sale and snag up the acrylic cheap. Either way, $178 vs. $430? There is an extra $252 in your pocket. And with the left over acrylic I made a skimmer stand, another $20+ item for free, and still have extra enough to make probe holder or whatever I can think of.
The First thing you need to do is design your sump. Aside from the chamber layout, think about the type of equipment you will have running in the sump, the location (under the aquarium stand, plumbed from another room,..) and you may also want to keep room for crazy future equipment that hasn’t been invented yet. I did.
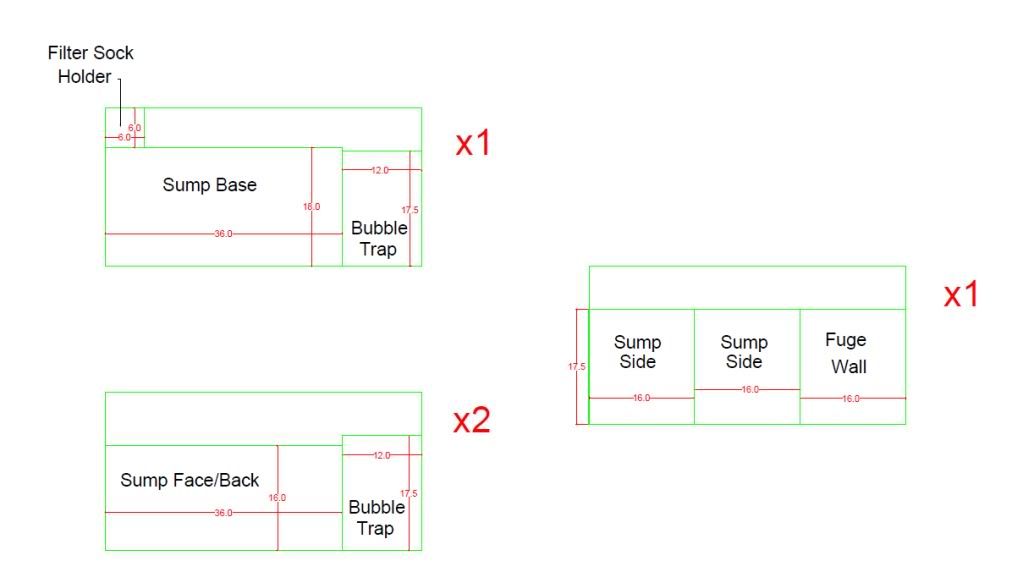
After you have decided on the design that best fits your needs, the next thing is to make a cut sheet so you know all your measurements. (Remember to take into account the thickness of the acrylic you use) Then figure out the best way to layout the cuts on the sheets to minimize the amount of acrylic sheets you need to use.
[ CableGuy liked this post
-
06-15-2011, 12:48 PM #3


Cut List
1x 18”x36” Sump Base
2x 16”x36” Sump Face/ Back
2x 17 1/2” x16” Sump Sides
1x 17 1/2” x16” Fuge Wall
3x 12”x17 1/2” Bubble Trap
1x 6”x6” Filter Sock holder
Use a sharpie to mark your cut lines on the blue plastic that the acrylic comes wrapped in. Then make them cuts.

*********If you choose to cut the acrylic yourself with a power saw make sure you are comfortable using them, they can be very dangerous!************
Cutting tips.
-It’s best to a saw blade for made for cutting plastic, if you don’t have one use a blade with the smallest teeth you have.
-Another trick is you can turn the saw blade around, so it spins the same way but the teeth face the other way.
- Make sure you use safety glasses. When you cut the acrylic the “saw dust” left from the acrylic is hot, melted plastic shards and eye balls don’t mix well. The “saw dust” will also feel hot when it lands on your skin so don’t be surprised and jump around and accidently cut yourself when this happens, and it will.
So after you have all of the acrylic sheets cut it’s now time to prepare the acrylic for gluing, sand the edges to remove the all burs until they are somewhat smooth. Then cut the painter’s tape in to around 6” strips and place them under the bottom sheet and stick the reset close for easy access.

Then I remove the blue wrapping from the edges on all the sheets to be glued, so it doesn’t get in the way when you glue, and the acrylic is still somewhat protected.

After that just lay down the beads of Weld-on#16 and place the sheets as shown,
*RED = Weld-on#16


Last edited by Badfish; 06-15-2011 at 12:55 PM.
 CableGuy liked this post
-
06-15-2011, 12:57 PM #4

-Use the precut strips of tape to hold the sheets together and for support while you are gluing. This is much easier if someone helps hold the sheets while you glue.7

After the sump tank” is finished wait about an hour for the Weld-on to harden before you add your baffles, bubble traps, Fuge wall, dividers, ect. I used old CD case and left over scrap acrylic strips for bracings when gluing my dividers

I made my sump with a 3-divider bubble trap between the skimmer and the return pump chambers and a 12 3/4”x 18”x16” fuge. I had some extra PVC sitting around so I made an overflow pipe hoping it will cut down on bubbles and noise from the fuge. And use the left over acrylic pieces to make corner bracing.

After one more hour of curing apply another bead of Weld-on to all the inside seems. This will help to fill any gaps that may have been missed the first time. Remember this is a Sump it doesn’t need to look pretty, just hold water, so gob it on if you like. After you have your sump customized they way you want it let it sit for 24- 48 hrs while it cures (I’m not totally sure curing time on the Weld-on, I had water in my sump 24 hrs after I glued it).

Then fill it up and test for leaks, if you find any, empty the sump dry it off and apply Weld-on where needed, then let it dry and try again. After a few days, weeks, months, or whatever you feel comfortable with of no leaks it’s ready to go! Now that you know the seams don’t leak you can then add bulkheads if you plan on running external pumps, or skimmers.

Hopefully you are happy with your sump and it works as well for you as mine did for me. AND you just saved around $252, so feel free to send some of that green this way. (I know you’re just going to spend it on something else for your tank.) ENJOY YOUR NEW SUMP!

Last edited by Badfish; 06-17-2011 at 06:05 PM.
-
06-15-2011, 07:10 PM #5

Awsome write up!!!
-
04-28-2014, 12:58 PM #6CR Member


- Join Date
- Apr 2014
- Location
- Keyser, WV
- Posts
- 1
- First Name
- Don
 Plumbing your SUMP
HEY! I realize that your original post on the "Don't Be a Chump..." was several years ago BUT I just found it.
Would you please post a followup showing the actual plumbing in your system OR at least, how it was intended to be plumbed?
Your descriptions were excellent and the photos clear and concise. However, it's been over 20 years since I last had a Berlin system and I'm wanting a "refresher" course on updated technologies, lol.
I have a commercial sump given to me but I'm not liking the architecture he incorporated for a fuge.
Many thanks!
Don Carner
Similar Topics
-
2012 Nano Reef Contest Badfish & LittleMermaids 2.5 Nano Build
By TheLittleMermaid in forum Nano ContestReplies: 47Last Post: 06-10-2012, 09:20 PM -
Tanks, Sumps & Refugiums 1st sump build
By jehudial in forum BasicsReplies: 0Last Post: 02-14-2012, 02:38 AM -
DIY Sump -Build
By lemonyx in forum DIY Projects & PlansReplies: 19Last Post: 05-06-2010, 11:16 AM


 Reply With Quote


